 One important yet often overlooked responsibility of marketing professionals is ensuring that the salespeople we work with are informed about a prospect’s movement throughout the lead lifecycle.
Until the birth of Slack and other conversation platforms, this was difficult. It required that salespeople watch for email alerts, or worse — to actually open up their customer resource management tool and look at the activity history of a lead. With Slack and several other communication platforms coming onto the scene, marketers can now get timely and meaningful alerts in front of their salespeople.
This DIY guide shows you how easy it is.
Which martech tools are covered in this DIY guide?
HubSpot and Slack are two of the most used solutions in marketing automation and corporate chat. Thus, this guide is written specifically for those using HubSpot and Slack. However, the Zapier integration that I recommend you use to tie your marketing automation and communication tools together works similarly no matter what solutions you have in your martech stack.
While the direct steps may differ slightly, if you read through this guide and have a good grasp of what’s covered, you’ll be able to use that knowledge to build similar sales alerts in almost any martech stack.
Easy-to-set-up sales alerts in Slack
One of my recent clients was using Slack and HubSpot. The sales team was active on Slack already, discussing deals, asking questions of each other, coordinating sales events, etc. Their marketing team was using HubSpot and had recently launched some sales enablement drip campaigns in HubSpot.
This organization had a problem with sales follow-up. They had stopped using SalesForce and moved to an in-house CRM. While their new CRM had some advantages, there was one major disadvantage — there was no way to easily build reports that showed sales management which leads hadn’t been fully followed up on.
We talked through several possibilities and landed on a solution in which salespeople would be alerted, inside of Slack, of stale leads. If they didn’t follow up within a given time period, the sales manager would be alerted.
Here is how we built that system.
1. First, open up Slack and create a new channel
Click the + sign next to “Channels” in the navigation sidebar. I set the channel to private and only invite the salespeople, so they don’t feel like the whole world is watching their errors. This is all you need to do in Slack to create a new channel.

2. Now create a list inside of HubSpot
Go into your HubSpot account and open up the list builder under the “Contacts” parent menu item.
After you click the “Create a new list” button at the top right of the lists page, you’ll be taken to a page where you can set up the list. Here you’ll input a memorable name, set the list type to be a smart list, and create your list logic.

For the list logic, you simply want to have all leads in the list that have not yet been attempted. Most CRMs will have a lead disposition of “attempted,” which is what the salesperson would set the lead to after they called or emailed the prospect. As you can see below, the logic in the HubSpot list is simply [last disposition name] has never been equal to [attempted]. This list is automagically updated by HubSpot to only have leads in it that haven’t yet been attempted by sales.
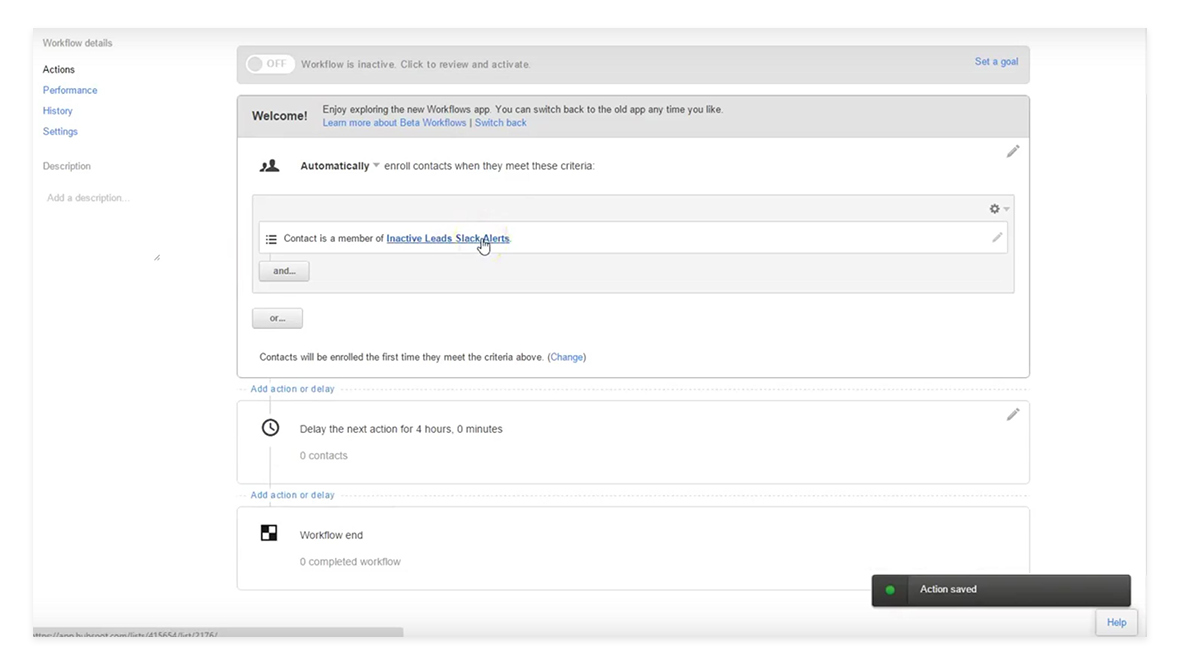
3. Create a workflow inside of HubSpot
Now go to the Workflows page, which can be found under the “Contacts” parent menu item. Click on the “Create new workflow” button at the top right. Name the workflow something memorable, and select the “standard” type of workflow.
In the first part of the workflow, where you’re selecting who will enter the workflow, select to “Automatically” enroll contacts when they meet the following criteria: contact is a member of the list you just created in step 2.
Now set up a delay step. Here you will say to “Delay the next action for ______” and put in the time you’d like to allow your salespeople to follow up with their leads. In the example below, you’ll see that I’ve set it to four hours. This means that if the salesperson hasn’t followed up with the lead in four hours, then they’ll get a Slack alert.
Before you close this workflow, you need to add a simple if/then branch to check if the individual is still a member of the list. What that will do is, after the four hours are up, go back to the original list you set up in step 2 and verify that they’re still in the list. If they are, you know the salesperson has not gone into the CRM and set the record as “attempted.”
If they are not in the original list, allow the workflow to end. Nothing needs to happen.
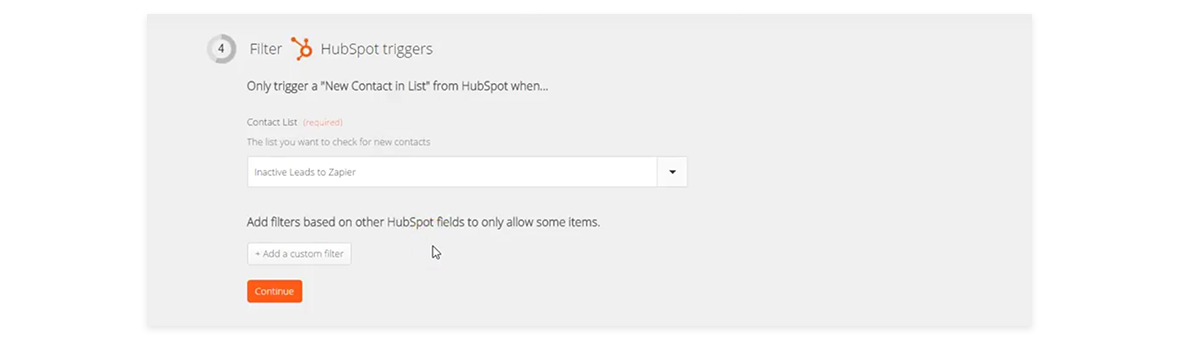
If they are in the original list, then you want to add them to a static list. Create a static list, just like you did in step 2, and name it something such as “Inactive leads to Zapier.”

That’s everything you need to do in HubSpot.
4. Set up your Zap in Zapier
The last step is to create a Zap, what could be considered the integration recipe, to get HubSpot and Slack talking to each other. Zapier is a great and affordable tool. Most basic businesses can use the free version, but if you plan on creating more than five zaps, you’ll need to pay for an account (which is $20/month).
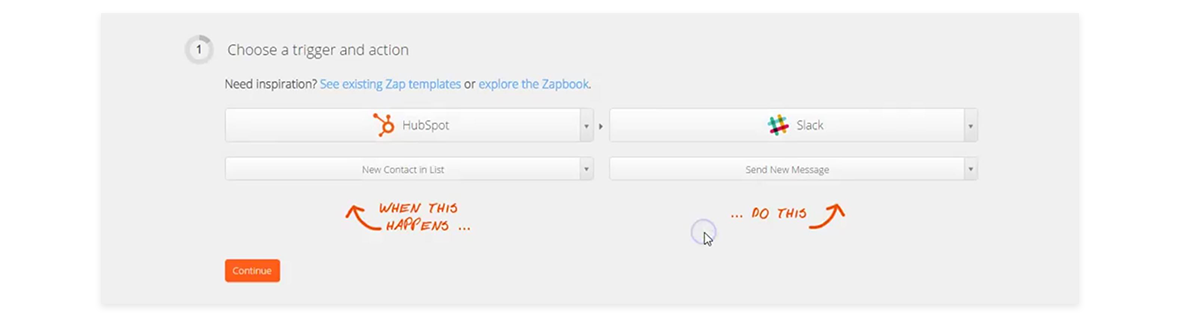
After you log into Zapier, click the “Make a Zap” button at the top. The first thing you’ll do is select your trigger app (HubSpot) and your action app (Slack).
After you’ve clicked on the HubSpot and Slack items in the drop-down menu, you’ll then select the actual trigger and action items. For the HubSpot side, select “new contact in list” and for the Slack side select “Send new message.”
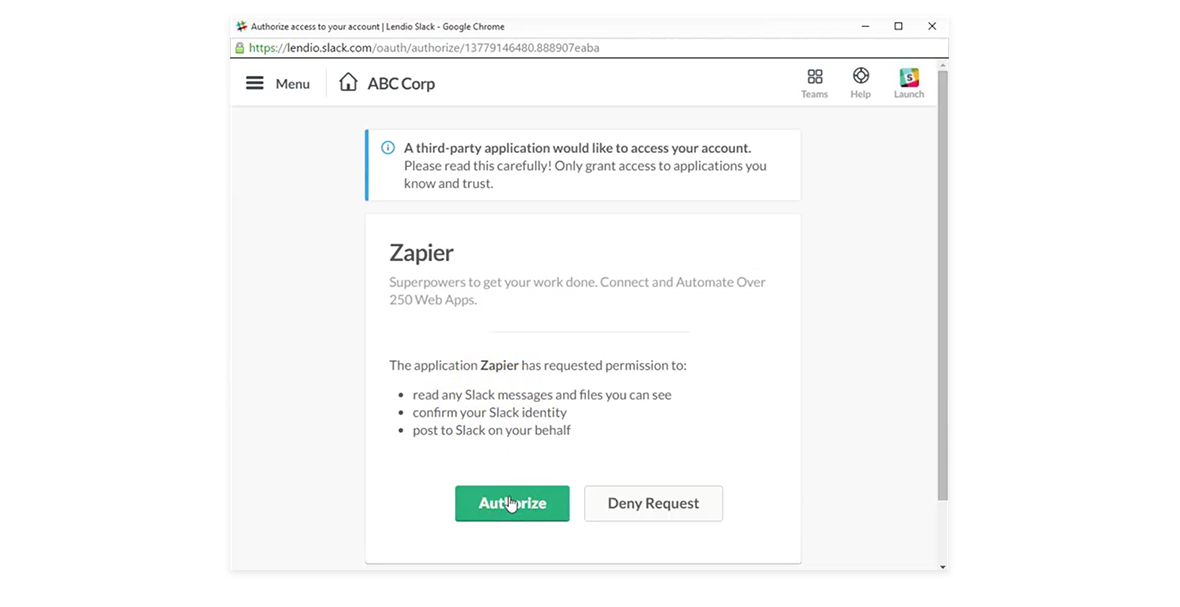
The next section of the Zap page is where you’ll give Zapier permission to connect to your HubSpot and Slack accounts. You do this simply by clicking on the relevant buttons and then giving permission, via the HubSpot and Slack login screens, to allow Zapier to use your accounts. This step is easy and works the same way as a “sign in via Facebook” action does in mobile apps. Below is an example of what this authorization page looks like on the Slack side.
The next section on the Zap page will ask you to select which list you want to use as the trigger. Select the static list you set up. By having this static list set in Zapier, it will tell Zapier that every time a new lead is added to the list in HubSpot, it should then trigger the Zap and pass some details from the lead into a Slack message.
Note: Sometimes Zapier will not see a list until it has at least one contact in it. If you’re not seeing your list in the drop-down in Zapier, this is why. Simply go into HubSpot and add a dummy record to the static list.
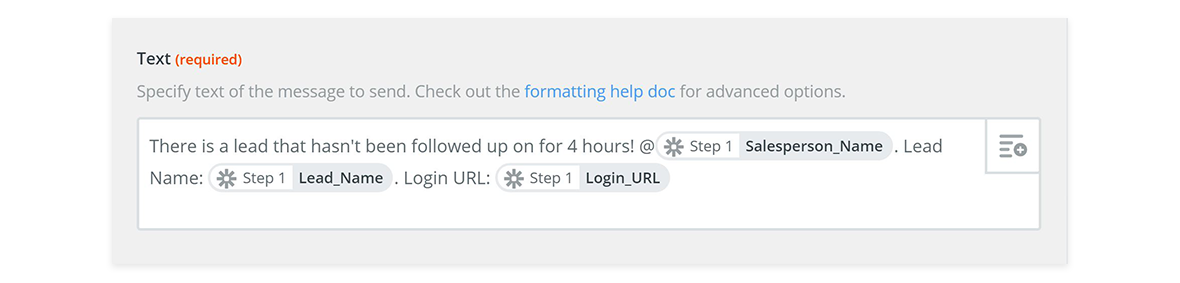
Okay, now for the last step in the Zap. In the last section, you will set up the actual message that will be sent to Slack. There are a few fields here you’ll want to fill in:
- Channel. Here you will set the name of the channel that you created in step 1 of this guide. You can also put in the Slack username of the salesperson assigned to the lead. To do that, you would click the “Insert HubSpot fields” button. Of course, for this to work, you’ll need to be storing the salesperson’s Slack username in their CRM user profile.
- Text. In this field, you put in the actual message you want. Click the “Insert HubSpot fields” button to insert any text about the actual lead that you want. For example, you can insert the lead’s name, their email address, etc.
- Username. In this field, you put in the Slack username for whomever you want the sales alert to show up as coming from. For example, you can set the username of the VP of Sales, to add some urgency and accountability.
- Parse mode. Ignore this. It’s optional and doesn’t need to be set.
- Icon URL. In this field, choose an image to use as the bot icon. Because the message is being posted by a bot, it will not pull in the avatar of any specific user unless you set it here.
- Emoji, Image URL, others. There are several other fields that you can complete if you’d like to. They aren’t necessary.
After you set up the message and any other fields you want, give your Zap a name and activate it.
That’s it! Your salespeople will now be receiving alerts in Slack for stale leads. Easy, right!?

Other potential integrations for sales alerts
Communicating with your salespeople where they are already collaborating with one another is imperative. Whether they are using Slack, HipChat, or one of the other chat tools currently available on Zapier, you can get real-time alerts in front of them.
And it doesn’t just stop at alerts for new and aging leads…
I’ve built similar alerts for my main employer, Kuali, where the salespeople are alerted each time a potential customer clicks on a link in an RFP (request for proposal). Because Kuali sells to higher education, which has a complicated and long sales cycle, they complete a lot of RFPs. Once they’ve sent the RFPs in, it’s a waiting game in which our salespeople have little visibility into the decision-making process on the university side. They asked me if we could track when they clicked links in the RFP to come view content on our site. Indeed, we could, and with the magic of Google Analytics, Google Sheets and a Slack integration via Zapier, our salespeople now receive alerts each time someone engages with their RFPs.
What creative ideas do you have for leveraging Zapier and Slack alerts in your sales process? Let us know in the comments.